U.S.S. Defiant NCC-74205-C
Created by Commodore Wilkan Targaryen on Thu Nov 27th, 2025 @ 4:44pm
U.S.S. Defiant NCC-74205-C
 | |
| Affiliation: | Federation Starfleet |
| Service Period: | 25th - 26th Centuries |
| Length: | 211 meters |
| Width: | 166 meters |
| Height: | 36 meters |
| Mass: | 440,625 metric tons |
| Decks: | 6 |
| Crew: | 66 personnel 250 evacuation |
| Speed: | Warp 9.97 |
| Armament: | Phaser Arrays Pulse Phaser Cannons Torpedo Launchers |
| Auxiliary craft: | Starfleet Shuttlepods |
Overview
The U.S.S. Defiant (NCC-74205-C) stands as a definitive evolution of Starfleet’s tactical doctrine, engineered to address the profound vulnerabilities exposed during the catastrophic fleet losses of the 2420s. As a Valiant Class escort, the vessel’s keel was laid in 2432 to serve as a persistent, physical reminder of the Federation's resolve following a decade where light forces were frequently outmatched by Borg remnants and the tactical density of the Niljaad Dictatorship. Designed with a compact, 211-meter "over-built" frame, the Defiant-C emphasizes a low-profile silhouette with heavily armored, integrated nacelles intended to minimize its target signature during high-intensity skirmishes. Unlike its 24th-century predecessors, the Valiant Class features significantly improved internal volume, allowing a crew of 66 to operate independently for up to two years—a mechanical necessity for modern border enforcement and persistent patrol duties.The construction of the Defiant-C was a landmark achievement for the Bajoran Okana Shipyards, serving as a strategic proof-of-concept that the facility could produce frontline Federation starships. While the vessel was originally scheduled for delivery in early 2436, the timeline was drastically accelerated following the catastrophic events of the 2433 Bajoran Crisis. The ritual attempt to release Skrain Dukat from the wormhole by a Bajoran fanatic, alongside a rogue Cardassian shadow ambush to steal a mysterious Red Orb, caused severe structural damage to Deep Space 9 and resulted in the loss of the Defiant-B. Consequently, Starfleet Command prioritized the completion of the new escort, authorizing the Corps of Engineers to defer several planned technological upgrades to ensure the vessel could launch early in 2434 to supplement the U.S.S. Yorktown in defending the system.
Upon its commissioning, the Defiant-C immediately assumed a dominant role in regional security, becoming a primary law enforcement asset in the Bajoran sector. It quickly established a reputation for aggressive anti-piracy operations, becoming the bane of the Orion Syndicate after successfully interrupting over a dozen raids on neutral shipping. During the period when Deep Space 9 was non-operational and the Denorios Belt was placed under a heavy blockade by a Tzenkethi Coalition dreadnought task force acting as a proxy for the Typhon Pact, the Defiant-C took over the essential responsibility of protecting covert Starfleet engineering teams. As the Defiant was built around a massive power core that feeds quad forward-facing Pulse Phaser Cannons, the ship functions as a "pocket battleship," utilizing an Integrated Tactical Package and Ablative Armor to withstand fire that would cripple much larger cruisers.
In 2435, following the sudden front-line fleet engagements driven by the massive Vaadwaur Invasion, the Defiant-C returned to the newly restored Deep Space 9 for an extensive refit. This overhaul integrated the specialized systems that had been deferred during its initial, rushed construction. The starship was upgraded with advanced alloys, electromagnetic shielding, and an electronic countermeasure suite to compensate for its lack of a cloaking device, making it significantly more difficult to detect by hostile sensors. Additionally, its sensor arrays were retrofitted with high-resolution "Deep Space Awareness" software, improving its ability to monitor potential Typhon Pact threats from several parsecs away.
Following its relaunch in late 2436, the Defiant-C resumed its duties as the primary mission support vessel for Deep Space 9 under the command of Captain Loatha Targaryen. This period coincided with the rising cold war against the officially recognized Typhon Pact—the adversarial alliance linking the Romulan Free State, the Tholian Assembly, and other hostile regional powers. The vessel played a critical role in the shadow conflicts of the late 2430s, monitoring the deep-frontier safehouses and patrolling borders as the Pact sought to challenge the Federation's technological edge.
By 2439, the Defiant-C remains attached to Deep Space 9. Following the eerie "Silence of DS47"—where a cybernetic virus hijacked responding starships—and a dangerous black-market time crystal crisis, the Defiant-C and the newly built flagship U.S.S. Enterprise-H have become the primary anchors of Federation stability in the sector. Acting alongside Captain Wilkan Targaryen after the Enterprise-H was utilized as a tactical battering ram to secure the station from radical Klingon forces, the Defiant-C stands as a "first-on-scene" responder at the edge of the Wormhole. Positioned at the mouth of a newly opened Gamma Quadrant frontier secured by the historic Dominion Non-Aggression Pact, the Defiant-C remains a symbol of a Federation that refuses to be broken by the external pressures of a fragile galaxy.
Layout
Deck Layout |
|
|---|---|
| Deck 01 | Bridge, Captain's Ready Room, Conference Room, Escape Pod Access, Head, Upper Sensor Modules |
Bridge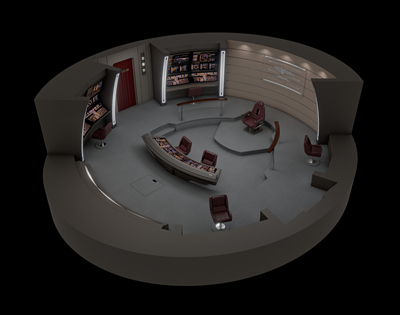 Located on Deck One, the Main Bridge of the Starship Defiant allows for easy supervision of all shipboard operations. The nerve center of the starship, the Bridge is constantly manned by members of the Senior Staff and has workstations dedicated to control every shipboard function. From this single location, the Commanding Officer could supervise all operations aboard the spacecraft. Located on Deck One, the Main Bridge of the Starship Defiant allows for easy supervision of all shipboard operations. The nerve center of the starship, the Bridge is constantly manned by members of the Senior Staff and has workstations dedicated to control every shipboard function. From this single location, the Commanding Officer could supervise all operations aboard the spacecraft.Sharing many characteristics with its Defiant Class ancestor, the Valiant Class Bridge is designed for superior combat performance, and the entire module was sunken into a much larger Deck 1 to provide added protection during combat maneuvers. Access to the bridge was provided by two doorways located on the port and starboard sides. Just forward of the starboard entryway was the location of the ship's dedication plaque, while a replicator was next to the port entry. Sunken into the center of the room is a lower platform containing a wide, curved, side-by-side console. This centralized console combines Flight Control and Tactical functions, placing the ship's navigation, helm inputs, and primary defense systems within arm's reach of the forward-facing operators. This unified configuration allows the Valiant Class vessel to be handled with maximum efficiency during high-stakes maneuvers, giving it the responsive feel of a much smaller scout vessel rather than a standard cruiser. The Captain's Chair sits on an elevated platform near the back of the room, positioned in the center of the room. This strategic placement grants the Captain a clear, unobstructed view of all forward console activity, the surrounding stations, and the large, trapezoidal main viewscreen on the forward wall. Directly behind the Captain's Chair, a transparent, backlit display panel showcasing a schematic of the ship's silhouette is mounted against a distinctive, multi-tiered horizontal wooden accent wall, adding a touch of classic warmth to the utilitarian space. Sleek, dual-rail metal handrails follow the contours of the deck, safely separating the upper perimeter platform from the central sunken command well. The four remaining perimeter workstations are fitted flush within the bulkheads along the upper platform to fulfill essential shipboard responsibilities. Working clockwise from the main viewscreen, these perimeter stations are designated as Science, Tactical II, Operations, and Engineering. Each workstation is framed by vertical white light bars and equipped with dense, double-tiered LCARS interface screens. These wrap-around displays ensure that the Bridge crew can rapidly monitor structural integrity, analyze spatial anomalies, manage power distribution, or pivot to defensive operations at a moment's notice.
Captain's Ready Room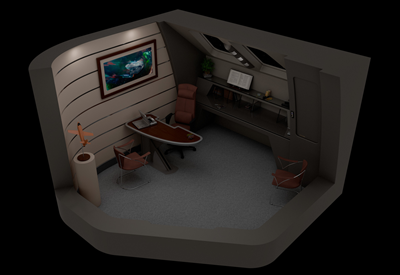 Located on the forward port side of Deck 1 aboard the Defiant, the Captain's Ready Room is a private workspace available for the Commanding Officer's use. Like early Starfleet vessels, office space aboard the Defiant was much more cramped than aboard other ships and had small windows and one door. Located on the forward port side of Deck 1 aboard the Defiant, the Captain's Ready Room is a private workspace available for the Commanding Officer's use. Like early Starfleet vessels, office space aboard the Defiant was much more cramped than aboard other ships and had small windows and one door.The main focus of the Captain's Ready Room was a small, wall mounted desk that sat in front of the pair of forward-facing windows. A standard issue desktop terminal was available for communications or the review of records by the Captain. The wall above the desk features a large copy of Vincent Van Gogh's Starry Night. An enclosed storage space, with an accompanying access keypad, was located next to the windows that the room's user could use for storage. Unlike other Ready Rooms within Starfleet there were no informal sitting areas, only two chairs for guests to use while in private meetings. A built-in shelving unit was located directly below the windows that could be decorated with personal belongings by the Commanding Officer. Currently, the shelving unit aboard the Defiant displays various knickknacks from the career of her Commanding Officer, as well as a copy of The Complete Sherlock Holmes.
Conference Room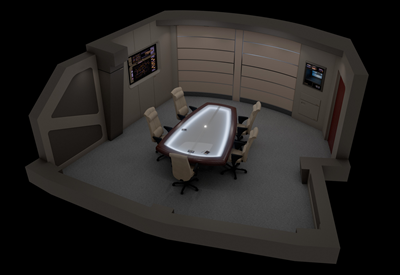 Located adjacent to the Bridge, the Conference Room on the Defiant provides a meeting place for the staff, as well as for special events and gatherings. Unlike most vessels, the Conference Room aboard the Defiant is not directly connected to the Bridge and must be accessed via a Deck 1 corridor. It was also much smaller than most other Conference Rooms within Starfleet, but that made it no less functional. Located adjacent to the Bridge, the Conference Room on the Defiant provides a meeting place for the staff, as well as for special events and gatherings. Unlike most vessels, the Conference Room aboard the Defiant is not directly connected to the Bridge and must be accessed via a Deck 1 corridor. It was also much smaller than most other Conference Rooms within Starfleet, but that made it no less functional.Positioned on the starboard side of Deck 1, the Conference Room aboard the Defiant was a non-nonsense, barebones room used by the Senior Staff and other personnel to have important meetings. While small, the room was comfortable and was equipped to provide a relaxed area for briefings. The dominant feature of the room was the centrally located conference table, which incorporated a holographic emitter and supported five chairs. The Captain sat at the head of the table, closest to the small forward-facing windows wallmounted display monitor supplemented the holographic display, allowing visual information and other records to be available during meetings. A replicator was also located near to the entrance, providing refreshments for meeting attendees. |
|
| Deck 02 | Crew Quarters, Engineering Support, Escape Pod Access, Head, Maintenance, Officer's Quarters |
Crew Quarters Crew Quarters on board the Valiant Class share many of the same design cues as their predecessors aboard the Defiant Class. As the Defiant was designed for espionage and tactical operations, the ship is relatively small compared to the average Starfleet vessel which has directly impacted the accommodations for its crew.
 Located on Decks 2, 3, and 4, the Crew Quarters were simple rooms that offered little comfort for their occupant other than a bed. Neither sizeable nor aesthetically laid-out when compared to other ships in the fleet, Crew Quarters on the Defiant were shared by at least two crewmembers during normal operations. Two stacking, twin-sized bunks were fitted into the walls of each cabin for the use of the room's occupants for sleeping and relaxing. While most crewmembers chose to consume their meals in the Mess Hall, a simple Replicator terminal was available to provide refreshments. A standard computer terminal was also built into a wall cabinet for the occupant's entertainment and occupants had to use communal restrooms located elsewhere on the deck.
Officers' Quarters Officers' Quarters on board the Valiant Class were located on Deck 2 and were very few in number. Due to the relatively small size of the Defiant, Officers' Quarters were very cramped when compared to their counterparts on larger Starfleet vessels.
Officers' quarters were single compartment rooms that contained a twin sized bed, a desk, several lockers, and built-in shelves for storage. There were no accommodations for guests within the Officers' Quarters aboard the Defiant and very few even had seating aside from the desk chair. While the Captain of a ship traditionally has the largest accommodations, aboard the Defiant the Captain has the same cabin as the Senior Staff; however, the Crew Quarters across the hall have been setup to be used by her children. As the structural components of the Defiant limited the availability of windows, only the Captain and First Officer had a view of space from their personal cabin. Despite this luxury, all Officers' Quarters had their own personal bathrooms containing a shower, lavatory, and sink. |
|
| Deck 03 | Docking Port, Crew Quarters, Environmental Control, Escape Pod Access, Head, Lateral Sensors, Mess Hall, Sickbay, Warhead Control Room |
Mess Hall Due to the limited space aboard the Valiant Class, the Mess Hall aboard the Defiant was one of the most popular locations aboard the spacecraft. The Mess Hall gave crewmembers a location where they could relax and enjoy a meal or a quick snack in a social setting. Additionally, despite the military nature of the Defiant's role, the Mess Hall also allowed a place where officials could be entertained while aboard the ship or other gatherings could be held. Due to the limited space aboard the Valiant Class, the Mess Hall aboard the Defiant was one of the most popular locations aboard the spacecraft. The Mess Hall gave crewmembers a location where they could relax and enjoy a meal or a quick snack in a social setting. Additionally, despite the military nature of the Defiant's role, the Mess Hall also allowed a place where officials could be entertained while aboard the ship or other gatherings could be held.Aboard the Defiant the Mess Hall was a compact and functional space. Three Replicator terminals were available at the head of the room with a counter allowing for the placement of trays, mugs, and eating utensils by crewmembers for ease in preparing their meals. Metallic tables arranged in a semicircle at the opposite side of the room comfortably sat four people and offered a place for the crew to socialize. While most Mess Halls boasted several large windows, the Defiant's Mess Hall had no windows.
Sickbay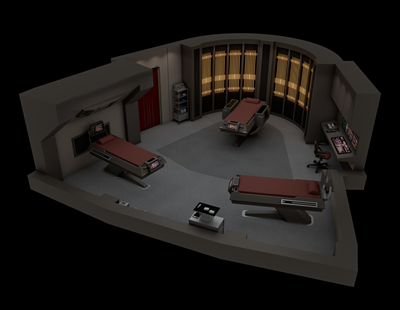 Located on Deck 3, Sickbay features a small, highly efficient layout designed to provide rapid triage and medical care. Echoing the compact design philosophy of its Valiant Class spaceframe, this facility optimizes every square meter to function as a fully independent trauma ward during frontier operations. Access to the ward is provided by a single, crimson sliding door on the aft port bulkhead. Located on Deck 3, Sickbay features a small, highly efficient layout designed to provide rapid triage and medical care. Echoing the compact design philosophy of its Valiant Class spaceframe, this facility optimizes every square meter to function as a fully independent trauma ward during frontier operations. Access to the ward is provided by a single, crimson sliding door on the aft port bulkhead.The centerpiece of the medical facility is a prominent, advanced surgical biobed situated within a sweeping, curved alcove. This primary bed is framed by an impressive wall of vertical, golden-orange illuminated diagnostic pillars that provide real-time sensory data. Flanking the central ward are two standard recovery biobeds built into dedicated wall recesses, each equipped with integrated overhead monitors and foot-mounted LCARS diagnostic readouts to trace patient vitals seamlessly. Given the streamlined layout, the Chief Medical Officer does not have a private, standalone office. Instead, a dedicated, built-in desk console is integrated directly into the starboard bulkhead. This compact workspace features an overhead storage unit, a flat-panel diagnostic interface, and a specialized medical inventory tray, allowing the physician to monitor the entire ward simultaneously. Mobile equipment carts and hardened medical storage cases are positioned neatly against the neutral bulkheads, ensuring rapid deployment during emergency triage situations.
Warhead Control Room An outgrowth of Starfleet's efforts to combat the Borg Collective, the Valiant Class has inherited the same detachable warhead system as the Defiant Class. The detachable warhead is a small pod that can detach from the Defiant and move under its own power toward a target. Once locked, the warhead sets its torpedo stores to overload and will set a collision course for the enemy, detonating on impact to inflict massive damage to an opponent. In an ideal situation a pilot would remotely steer the warhead toward its target; however, a small control room has been installed to accommodate manual piloting if necessary.
A fraction of the size of a traditional control center aboard a starship, the Warhead Control Room is no less efficient than its larger contemporaries. A lone Captain's Chair is located in the center of the room and includes keypad controls that can be used to access any system on the Defiant if need be. Directly ahead of the Captain, an integrated Flight Control and Operations workstation is used for piloting the warhead and managing its systems. Two large consoles located on the port and starboard bulkheads allow for access to sensor systems and weapons respectively. In an emergency situation, should the Bridge be incapacitated, the Defiant can be controlled from the Warhead Control Room. |
|
| Deck 04 | Battery Compartment, Computer Core - Upper Level, Crew Quarters, Escape Pod Access, Fire Control, Head, Navigational Control, Navigational Deflector (Deflector Control), Phaser Cannons, Plasma Relay Room, Shuttlebay - Upper Level, Torpedo Launchers, Transporter Room |
Shuttlebay The Shuttlebay was a specialized facility on the Defiant where shuttlecraft were launched, received, stored, and maintained. One of the largest single locations aboard the vessel, the Shuttlebay of the Defiant was similar to the Launch Bay on older starships. The Shuttlebay was externally accessed via one of two hangar doors and internally by pressure doors.
 The Shuttlebay opened from the ventral hull and was capable of holding two Shuttlepods. External access was provided to Shuttlepods through one of two sliding doors, which were operated from a control station on the upper gantry level of the bay. Unlike the Launch Bay on the old NX Class, the Shuttlebay of the Valiant Class could maintain atmospheric pressure during launch due to the development of force-field technology. When opened, the Shuttlebay space doors were replaced by a force-field that could be penetrated by the Shuttlepod while preventing decompression. A small Tractor Beam emitter installed in the ceiling of the bay would assist with Shuttlepod operations, helping to launch the craft by repelling it from its berth or assisting it with landing operations.
Transporter Rooms Due to the size of most Escort Class vessels typically the Transporter Chamber is located in a corridor based alcove to conserve space for more critical systems. This, however, changed with the Valiant Class which was constructed with twin Transporter Rooms located on Deck 4 of the vessel. Cramped, like other rooms aboard the Defiant, all necessary components needed for successful transport were fitted in this room. Due to the size of most Escort Class vessels typically the Transporter Chamber is located in a corridor based alcove to conserve space for more critical systems. This, however, changed with the Valiant Class which was constructed with twin Transporter Rooms located on Deck 4 of the vessel. Cramped, like other rooms aboard the Defiant, all necessary components needed for successful transport were fitted in this room.Designed to allow the transport of lifeforms and small, inanimate objects, Transporter Rooms on the Defiant were divided into four sections. Upon entering the room, personnel stood in a small staging area where they could discuss an upcoming away mission, distribute equipment, or greet any new arrivals to the vessel. Directly across from the entry was an equipment bay that maintained the necessary circuitry to allow the Transporter to function. The exclusive domain of the Transporter Chief, the operator's console was located in an alcove on a slightly raised platform at the back of the room. The front of the room housed the Transporter Pad, which only accommodated 3 people due to the Defiant's smaller stature. |
|
| Deck 05 | Antimatter Injection Reactors, Battery Compartment, Cargo Bay, Computer Core - Main Level, Deuterium Fuel Storage, Escape Pod Access, First Aid Station, Head, Impulse Engines, Main Engineering, Shuttlebay - Main Level |
Cargobay The Cargobays were general purpose storage areas aboard the Defiant. Due to the nature of the Defiant's assignments, the Cargobays on the Defiant were primarily used to keep equipment and other supplies meant for the usage of the crew during assignments and were rarely used to transport cargo intended for others. The Cargobays were general purpose storage areas aboard the Defiant. Due to the nature of the Defiant's assignments, the Cargobays on the Defiant were primarily used to keep equipment and other supplies meant for the usage of the crew during assignments and were rarely used to transport cargo intended for others.Larger than typical compartments on the Valiant Class, the Cargobays took up most of the center of Deck 5 aboard the vessel. Crescent shaped rooms, the Cargobays were only a single level tall and used twin doors located on either side for entry and egress. No Cargobay aboard the Defiant was outfitted with an exterior door to the hull, which required the crew to use the Transporter system to bring cargo aboard. As the Defiant had no dedicated cargo transporters, this was often completed by the personnel Transporters or by the base transferring cargo aboard the craft.
Main Engineering Consisting of a single level, Main Engineering aboard the Starship Defiant was located on Deck 5 of the starship. Also known as the Engine Room, from this location all of the ship's engines and main power systems were controlled and monitored. In the event of an emergency, Main Engineering was also a secondary control room for the ship, capable of supplementing the Bridge on Deck 1 or taking full control of the ship in case the Bridge was destroyed or disabled. Consisting of a single level, Main Engineering aboard the Starship Defiant was located on Deck 5 of the starship. Also known as the Engine Room, from this location all of the ship's engines and main power systems were controlled and monitored. In the event of an emergency, Main Engineering was also a secondary control room for the ship, capable of supplementing the Bridge on Deck 1 or taking full control of the ship in case the Bridge was destroyed or disabled.Under the direction of the vessel's Chief Engineer, entry to the Engine Room was located at the back of the room. As soon as you entered Engineering you saw the massive Warp Core in the center of the room, flanked by two Power Transfer Conduits feeding the vessel's Warp Nacelles. A large railing isolated the Warp Core from the rest of the room and offered protection for the Engineers from being directly exposed to the Core, which was often deadly. Large transfer conduits for fuel were placed behind the Warp Core, allowing the engineers easy access for maintenance. Two side doors lead to small storage areas and Jefferies Tube access points. Designed with efficiency in mind, Main Engineering is a fraction of the size of its counterpart compartment on other vessels. Primary operations in the room are handled by the four workstations located near the entry to the room. Unlike other vessels, the Master Situation Display for the Defiant is not a separate workstation and is built into the Chief Engineer's console furthest from the door on the port side. The Chief Engineer's controls are supplemented by a small workstation attached to the railing of the Warp Core that allows direct access to the controls of the Warp Drive. |
|
| Deck 06 | Antimatter Pods, Brig, Escape Pod Access, Head, Landing Gear, Lower Sensor Modules, Waste Management |
Brig Located on Deck 6, the Brig was a security holding area aboard the Defiant, which was essentially a prison cell. These areas were used to contain people who posed a security risk - such as criminals, fugitives, and those who were deemed a danger to themselves or others. Additionally, the Brig could be used as a means of punishment within the Starfleet ranks for those who defied an order or committed some other crime. In an emergency situation a prisoner could attempt to employ the emergency evacuation protocol, but this would only occur in life-saving circumstances. Located on Deck 6, the Brig was a security holding area aboard the Defiant, which was essentially a prison cell. These areas were used to contain people who posed a security risk - such as criminals, fugitives, and those who were deemed a danger to themselves or others. Additionally, the Brig could be used as a means of punishment within the Starfleet ranks for those who defied an order or committed some other crime. In an emergency situation a prisoner could attempt to employ the emergency evacuation protocol, but this would only occur in life-saving circumstances.The Brig was a heavily guarded room that was the smallest single location aboard the starship. Currently, the Brig comprised two distinct sections. Entry was into a small anteroom that contained a workstation where a member of the Security team could work to monitor a prisoner. The console allowed its user to access the cell's forcefield controls, review sensor feeds involving the prisoner, or access datafiles from the Defiant's computers. The cell itself was a spartan room that only contained a bed. A force field kept the incarcerated segregated from the anteroom. |
|
Assigned Vessels
Type 25 Shuttlepod
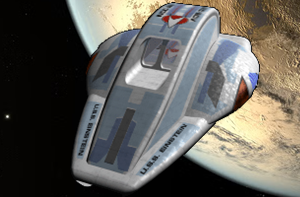 Inspired by its predecessor, the Type 18 Shuttlepod, the Type 25 Shuttlepod was designed to serve as the next generation orbit to surface shuttlepod. Compact, the Type 25 was primarily intended to move personnel and small amounts of cargo between nearby orbital habitats, planets, spacecraft, and space stations when using the transporter would be impractical or impossible. Highly dependent upon its mothership for support, Type 25 Shuttlepods were built without faster-than-light propulsion systems and with a limited armament, keeping them from straying too far while on routine assignment.
Entered through an aft airlock, the Type 25 Shuttlepod is a comprised of a single interior compartment and is maintained by a single pilot. Because of the limited space available, Starfleet Command has issued protocols that missions using this type of craft may not exceed 12 hours, even in emergencies, because of a lack of crew comfort. This lack of comfort is further exacerbated on cargo transfer missions as equipment and/or supplies were held directly behind the operator's station.
While under development Starfleet Command initially planned for a compact Warp Propulsion System to be included; however, due to the vehicle's size, the Corps of Engineers were unable to comply. Instead, a small Impulse Propulsion System was installed to feed the two Impulse Nacelles located on the exterior hull of the vehicle. As a consolation, the Corps of Engineers included an atmospheric ramscoop, similar to the one used by the Class F Shuttle in the 23rd Century, to offer superior handling within an atmosphere. A small defensive Phaser turret is also included to help with protecting the craft should it come under attack.
Type 25 Shuttlepod Assigned to the U.S.S. Defiant | |||
| Thomas Blair | 74205-C/1 | Named in honor of Captain Thomas Blair. | |
| James Kurland | 74205-C/2 | Named in honor of Captain James Kurland. | |
Key U.S.S. Defiant Personnel
 Commodore Gunisi Taalu Bajoran Male |
 Lieutenant Commander Broka Ferengi Male |
 Lieutenant (J.G.) Oshima Kiyohisa Human Male |
 Ensign Mazaan Rigelian Male |
 Lieutenant Mahlah Harbi, MD Human Female |
 Lieutenant (Junior Grade) Iucet Nizeihl Acamarian Female |
 Lieutenant (J.G.) Wodran Jof Bajoran Male |
Categories: No categories found